How To Perform Bodyweight Exercises With Correct Form


Finding the time to work out can be challenging, but It’s a great feeling to look back at where you started on your fitness journey and to see how far you’ve progressed.
Perhaps you’ve set a new PB (personal best) for the number of push-ups you can do in a row, you can see signs that your overall fitness is improving or you are simply feeling stronger and more confident.
But there’s one thing we can all get caught up in, especially if you have a competitive nature, and that’s pushing yourself to get through the reps in a workout.
The problem with focusing on quantity is that you might actually be compromising your technique just to get your workout done.
When you don’t complete the exercises with good form, you might not be getting the most out of your workout, or even setting yourself back by causing injury.
As a personal trainer, I always emphasise that you should aim for quality over quantity! From squats to box jumps, I’m going to explain how to complete each of these exercises with correct form, and highlight some common mistakes so that you can avoid making them when you work out.
Find out:
Here are the top exercises to focus on your form
I know that a lot of you like to track your fitness progress by monitoring how many laps you can get through in each circuit of my High Intensity with Kayla program.
Don’t get me wrong, this is DEFINITELY a good way to challenge yourself and to keep yourself accountable, but if you’re just starting out, focusing just on your speed can cause you to lose focus.
As you strive to meet your weekly goals, you’ll soon get fitter, stronger and more confident — I can guarantee that you will be able to pick up your speed WITHOUT losing your form.
Below are some of the most common bodyweight exercises that I see performed incorrectly, and how you can fix them!
Burpee
I LOVE burpees! They are such an effective bodyweight exercise because they train the WHOLE body. But if you aren’t doing them correctly, you miss out on all the amazing benefits.
Here’s how to tell if you are doing them wrong.
You have shoulder pain
If you experience shoulder pain after burpees, this might be due to how you land when dropping down to the plank position.
Doing burpees with bent elbows or your shoulders out of alignment can lead to you putting unwanted strain on your ligaments and joints.
Focus on staying in a proper plank position, with your hands placed in front of you, shoulder width apart. Your shoulders should be in line with your wrists and arms straight — I’ll show you how to do a proper plank further down.
Your hips droop
When you jump your feet back during a burpee, you might notice that your hips droop — this is really common and can put stress on your lower back as a result of not engaging your core properly.
Correcting this can be as simple as focusing on engaging your core throughout the movement — this might mean slowing right down.
You can also work on building your core strength to help keep your hips aligned with your body and to stabilise your hips and spine.
You struggle to jump your feet in
Probably the hardest part of the burpee is to jump your feet back in to return to a squat from the plank position, and transition into the vertical jump.
If you find this movement hard, it might be because your hips are tight. When you push through this uncomfortable feeling, it can cause you serious injury.
Focus on stretching the hips and increasing mobility with hip flexor and glute exercises. You can also remove the jump and step out the exercise instead.
Key points to remember
Burpees actually involve a combination of a few different bodyweight exercises like a plank, squat and vertical jump.
If you're a beginner, it’s important that you break down the movement and perfect your technique with each part of the exercise first.
Some key points to remember are:
- Keep your core engaged
- Break down the movement — step out and in if you need to
- Remove the jump to lessen pressure on your knees
- Breathe!
How to do a burpee correctly
- Plant both feet on the mat shoulder-width apart. This is your starting position.
- Bend at both the hips and knees to place your hands on the mat on either side of your feet, ensuring that your spine remains in a neutral position.
- Inhale. Jump both of your feet backwards so that your legs are completely extended behind you, resting on the balls of your feet. Your body should be in one straight line from your head to your heels.
- Jump both of your feet forwards in between your hands, once again, ensuring that your feet remain shoulder-width apart.
- Exhale. Propel your body upwards into the air. Extend your legs below you and your arms above your head.
- Inhale. Land in the starting position, ensuring that you maintain ‘soft’ knees to prevent injury.
Repeat.
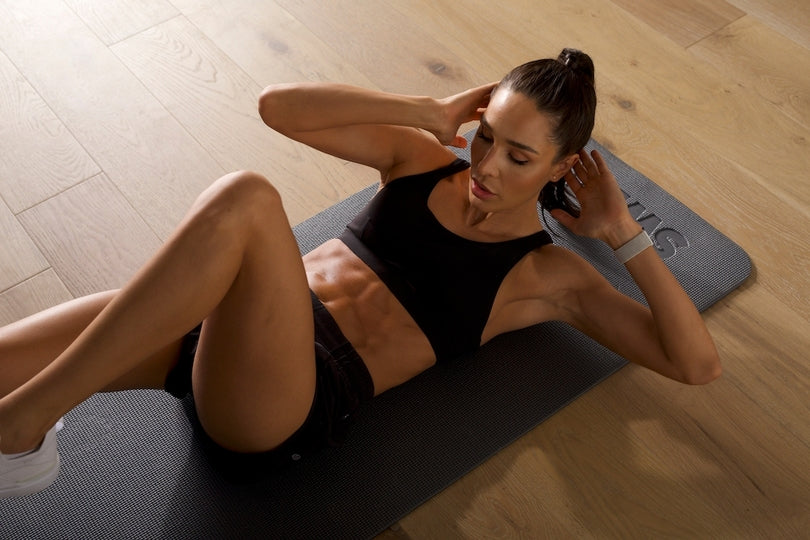
Push-up
Push-ups are tough, but they are a great upper body exercise that get your shoulders and chest working hard.
Here are some things to look out for to know if you might be doing your push-ups wrong.
Your elbows are at the wrong angle
One of the most common mistakes when it comes to push ups is having your elbows flared too wide — similar to a T-shape.
A good indicator of this is that you may experience shoulder pain or pinching. When your elbows are too wide, it can also cause you to turn your hands in, which causes more pressure on the wrists and elbows.
Focus on keeping your elbows at 45 degrees from the body. If this is too difficult to do on your toes, try an incline push-up using a table, bench or wall, to get your technique right first.
Your hands are too far apart
Another common mistake is having your hands too far forward or too far apart, when they should be in line with your shoulders.
This can place unnecessary stress on your shoulders and elbows and can increase your risk of injury.
Your neck is tensed
If you notice that your neck feels strained, you are probably forcing your head upwards to look out in front of you. This is actually really common!
What this does is that it causes you to engage your NECK muscles, and not your upper body and core.
Keep your gaze SLIGHTLY out in front of you during a push-up, without straining your neck. To engage the muscles that you SHOULD be using, try to spread your fingertips and twist your hands into the ground like you’re trying to pull them apart.
Your hips sag
If you don’t engage your core during push-ups, your hips can start to sag. While this might help you to get through your workout, you really aren’t getting much out of the exercise at all!
Make sure to keep your tailbone tucked under, and hips in line so that you aren’t placing unwanted strain on your lower back.
Your butt sticks up
If you push your butt up towards the ceiling, this can compensate for poor core strength which puts more pressure on your shoulders, arms and upper traps.
Think about engaging your core the whole time during a push-up, using your quads and glutes to help you drive up from the bottom of the movement.
You don’t complete full reps
If you struggle with push-ups, you might find yourself not lowering your chest to the ground as much as you should be. This limits the range of motion and strength you build.
Starting with push-ups on your knees can help you to work towards increasing the range of motion and your upper body strength.
Key points to remember
If you don’t have the strength to perform a full push-up just yet, or find that you are doing any of the things I’ve mentioned, you can do a push-up on your knees or on an incline and progress from there!
Think about these things first before doing your next push-up:
- Push away from the ground as much as possible
- Elbows point backwards
- Engage your core and maintain a straight line from head to toe/knee (avoid letting your hips dip)
- Keep your eye level neutral (look ahead, not at your toes)
- Keep your hands parallel with your body and directly below your shoulders
- Focus on slow and controlled reps if you’re a beginner
How to do a push-up correctly
- Place both hands on the mat slightly further than shoulder-width apart, feet together on the mat behind you while resting on the balls of your feet. This is your starting position.
- Inhale. While maintaining a neutral spine, bend your elbows and lower your torso towards the mat until your arms form two 90-degree angles.
- Exhale. Push through your chest and extend your elbows to lift your body back into the starting position.
Repeat.
Box jump
A box jump is a plyometrics exercise that works your lower body, but they can be scary when you attempt them for the first time.
When you break it down, a box jump is actually a lot easier than you think— here’s how to tell if you are doing them wrong, and how to nail them.
You land with impact
Whether you’re a beginner or more experienced, it can be easy to forget about a safe landing during a box jump.
The way you land is SO important, especially if you have any knee concerns. When you land awkwardly on your heels, inside or outside of your ankles, or on one foot before the other, this can cause damage to your joints and soft tissue.
Like I mentioned with the burpee earlier, if you have weak hips or glutes, this can also make the jump difficult.
Land with soft knees to absorb the impact of your jump or alternatively, avoid jumping altogether and work on developing your lower body strength first.
You jump off the box
I see a LOT of women do this! Please ladies, do NOT jump off the box ESPECIALLY if you are a beginner.
This only puts more stress on your knee joints and can lead to injury.
Step down off the box, or if the box is too high use a smaller step or box to gradually step down onto.
Your knees cave in
This is also known as ‘valgus collapse’ and is when you land in a knock-kneed position. This can happen during box jumps or other exercises like squats and lunges and can lead to ACL injuries.
To land safely, ensure your knees track over your feet, with your hips behind your knees and your weight distributed evenly across each leg.
You can improve this by strengthening your leg muscles, in particular your glutes.
Key points to remember
You can work your way up to box jumps by doing step-ups instead — I’ll tell you how to do step-ups below!
If box jumps appear in your next workout, here are the main things you should consider:
- Jump off the ground with both feet
- Track your knees over your toes
- Land with soft knees and your feet firmly on the box
- Use your arms for momentum as you jump off the ground
- Brace your core
How to do a box jump correctly
- With a plyometric box directly in front of you, plant both feet on the floor shoulder-width apart. This is your starting position.
- Inhale. Looking straight ahead, bend at both the hips and knees, ensuring that your knees remain in line with your toes. Continue bending your knees until your upper legs are parallel with the floor. Ensure that your torso remains as upright as possible. This is called squat position.
- Exhale. Propel your body upwards and forwards, drawing your knees into your chest, to land in squat position on top of the box. Ensure that you maintain ‘soft’ knees to prevent injury.
- Inhale. Push through your heels and extend your legs to find a standing position on top of the box.
- Exhale. Carefully step backwards off the box, one foot at a time, to return to the starting position.
Repeat.
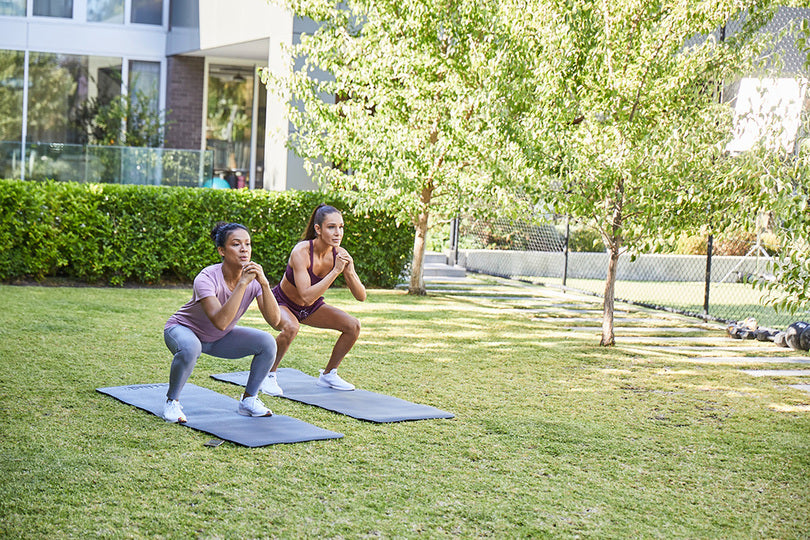
Squat
What’s leg day without squats? Squats not only target the glutes, hamstrings and quads, but your hips and abs as well!
So you can see how when done correctly, this exercise can be really effective. Here are a few squat mistakes I see.
Your weight is too far forward
A squat with good form involves you distributing your weight evenly across both legs, keeping your heels flat on the floor.
If you lean too far forward, you place stress on the musculature around the knee, causing knee pain.
If you squat just using your knees, this can cause your weight to come forwards. Initiate the squat by bending at the hips and knees simultaneously to take stress off your knees.
Your knees turn in or out
I’ve already discussed the issue with turning your knees in during some exercises. When your toes and knees rotate too far OUTWARDS, this can put stress on your knee joints, IT band and other muscles on the outside of the leg.
Keep your hips stacked over your heels and knees over your ankles — a good rule of thumb is to keep a shoulder-wide stance but you might need to adjust this according to your body type.
Your core isn’t engaged
As with most of the exercises I’ve mentioned here, your core should be engaged the whole time during a squat.
If you arch or round your lower back you won’t engage your abs. Keep a neutral spine so that you can recruit the right muscles like your glutes, and take the pressure off your back.
You look to the ceiling
If you look too far up by bending your neck, you can put excessive strain on the vertebral discs.
Maintain a neutral spine by engaging your core and look directly in front of you.
Your knees go past your toes
Another contributor to knee pain can be when your knees go past your toes at the bottom of the squat.
This results in QUAD dominance, where you should predominantly engage your GLUTES during a squat.
To check your form during the movement, look down to see whether your toes are visible. If they aren’t, sit further back into your squat.
You don’t go low enough
If you don’t go low enough in your squat, you might not engage your glutes and hamstrings properly.
Bend your knees until your upper legs are parallel with the floor and keep your torso as upright as possible.
Key points to remember
You can place a box underneath your butt to help you set a consistent depth to reach and slowly squat down to practice your technique.
These are my TOP tips to avoid injury and master your form when squatting:
- Shoulders back
- Torso upright
- Neutral spine
- Brace your core
- Knees in line with toes
- Engages your glutes
- Bend from your hips AND knees
How to do a squat correctly
- Plant both feet on the floor shoulder-width apart. This is your starting position.
- Inhale. Looking straight ahead, bend at both the hips and knees, ensuring that your knees remain in line with your toes. Continue bending your knees until your upper legs are parallel with the floor. Ensure that your torso remains as upright as possible.
- Exhale. Push through your heels and extend your legs to return to the starting position.
Repeat.
Lunge
Lunges not only are a great lower body exercise, but are a really good way to challenge your balance.
You focus on stability through your core as you complete each rep.
There are a few things you need to look out for with your lunge to make sure your form is correct.
Your knees cave in
Weak hips, glutes, hamstrings and quads can all contribute to your knees caving in during exercise.
It can also be due to limited ankle mobility — this typically happens if you skip your warm up and cool down particularly before and after activities like running and sprints. Your calves might also feel really tight.
To avoid this, train your lower body to improve flexibility and strengthen any weak areas.
You lean too far forward
When you lean too far forward or to the side, this can put extra pressure on your knees and lead to imbalances if you place too much weight on one leg.
Maintain an upright posture during your lunge and ensure your weight is even across both legs.
You can take a bigger step forward if you find this helps to keep your knee in line with your toe each time you lunge.
Your feet are in a straight line
Naturally, you might place your feet in line, one behind the other, when you lunge. This is actually incorrect!
Keep your feet shoulder-width apart and hips straight — you will notice that you have a lot more stability doing this.
Key points to remember
There’s no doubt that lunges challenge your balance and when done correctly they are so beneficial!
If you find lunges hard, hold onto something stable like a table or if you have some gym equipment available, goblet and dumbbell lunges are a great lunge progression.
These are main things to watch when performing lunges:
- Ensure your back knee is directly below your hip and aligned with your body
- Keep your front knee aligned with your foot
- Keep your torso upright throughout the movement
- Take a large step forward
- Lower your back knee to the ground ensuring your torso remains upright
How to do a lunge correctly
- Plant both feet on the floor in a split stance with your left leg forward and your right leg back, ensuring that your feet are shoulder-width apart. This is your starting position.
- Inhale. Bend both knees to approximately 90 degrees. If done correctly, your front knee should be aligned with your ankle and your back knee should be hovering just off the floor.
- Exhale. Extend both knees to return to the starting position.
Complete an equal number of repetitions on each side.
Plank
Ladies, I know this exercise doesn’t look like much. But trust me, when done correctly, the plank works the entire body — from head to toe!
There are a whole bunch of different plank variations you can do once you’ve perfected the standard technique — but you need to get your form right first.
Your hips are too high or too low
When your arms and abs start to fatigue during a plank, that’s when you might notice your hips start to lower or raise higher.
When this happens, your core isn’t as engaged and you may put strain on your lower back.
To keep your spine neutral, keep your hips up by squeezing your glutes and tucking your butt under.
If you need more stability, you can walk your feet slightly further apart.
Your elbows flare in or out
Make sure to keep your elbows directly in line and underneath your shoulders to prevent unnecessary shoulder strain.
Your hands should align so that you work both sides of the body evenly.
You drop your head down
I know time can seem to go FOREVER during planks, and while dropping your head might help you to focus more, this can actually be really bad for your neck.
Your head should ALWAYS be in line with your spine ladies, so next time you catch your head dropping, think about looking straight in front of you, not back at your feet.
Key points to remember
Planks help to build core strength, so they can reduce lower back pain — they shouldn’t CAUSE it. Use this as a checklist for good form every time.
- Keep your hips square and in line
- Engage your core and glutes
- Keep your gaze forward, not down
- Pull your shoulder blades down and press away from the ground
- Keep your shoulders and elbows stacked
- Keep your legs straight
How to do a plank correctly
- Start by placing your forearms (wrist to elbow) firmly on the mat, ensuring that your elbows are directly below your shoulders. Extend both legs behind you and elevate your hips off the mat, resting on the balls of your feet.
Brace your abdominals and ensure that your spine remains in a neutral position. Hold this position, breathing deeply throughout.
Glute Bridge
The glute bridge is one of the best glute activation exercises you can do before leg day!
It’s important to activate your glutes before a leg workout so that they engage correctly and prevent imbalances or injury.
I’m going to share a few of the most common glute bridge mistakes that I see below.
You extend through the lumbar spine
If you have any lower back pain during a glute bridge, you might be arching your lower back at the top of the movement. This usually happens in an attempt to get HIGHER.
Your focus shouldn’t be height, but to recruit and engage all the muscles that should be working like your glutes.
If you have tight hips and your glutes are underactive, other muscles like your back start to compensate too— that’s why I mentioned the importance of activating your glutes before your workout earlier!
When you use a resistance band around your legs during these exercises, this forces you to keep your knees out and trigger glute activation.
Your heels lift off the ground
You need to drive through your heels as you bridge up, which is why it’s important that your feet remain flat on the floor the WHOLE time.
A common mistake that I see is when women go up on their toes — this is only going to make it a lot more challenging for you and difficult to engage your glutes.
Your feet are too far away from you
Where your feet are positioned during the glute bridge helps to determine how much you get out of the exercise!
If your feet are too far away from your butt, your hamstrings are more likely to compensate.
To engage your glutes, walk your feet in towards your butt and drive through your heels as you go up, squeezing your glutes the whole time.
Key points to remember
The name of the exercise says it ALL — the glute bridge works your GLUTES, so if you feel other muscles working then you’re probably doing it wrong and risking injury. These are my top tips to help you do it correctly:
- Drive through your heels, with your fleet flat on the floor
- Squeeze your glutes
- Walk your feet in towards your butt
- At the top of the bridge, raise your hips to create a straight line from your knees to your shoulders
- Pull your belly button in towards your spine, squeezing your core.
How to do a glute bridge correctly
- Start by lying flat on your back on a yoga mat. Bend your knees and position your feet firmly on the mat, ensuring that they are hip-width apart and your spine is in a neutral position. Allow your arms to rest by your sides on the mat. This is your starting position.
- Press your heels into the mat, activate your glutes and raise your pelvis off the floor until your body forms one straight line from chin to knee, resting on your shoulders.
- Inhale. Lower your pelvis to return to the starting position.
Repeat.
Step-up
Step-ups help to build lower body strength and power, but they require a lot of core strength for stability.
You can increase the intensity of the exercise by incorporating weight once you have your form on-point, but first, let’s make sure you aren’t guilty of any of these mistakes.
Your knees cave in
I’ve already covered the risks, so I won’t go into detail again, but just remember that the knee on your lead leg should track over your middle toes — avoid letting it cave in or turn out!
You step up onto your toes
When you step up onto the bench or sturdy box, it can be common to step up with your toes first. This can risk injury by causing you to lose balance and happens when the surface is too high.
Start off with a lower step, stepping with your lead leg and planting your foot firmly on the surface so that you can power up through your whole foot.
You drop from the step
Control your descent so that you land gently and firmly on your back foot.
This helps to avoid injury from pressure that is placed on the back leg and joints.
Key points to remember
Power up through your lead leg during a step-up — your front leg should ALWAYS be engaged. To help you get it right every time, here are my top tips for the step-up.
- Front leg is the working leg
- Drive up through your whole foot and power through the front leg
- Step up flat on your foot, not on your toes
- Slowly descend, don’t drop
How to do a step-up correctly
- Place a bench horizontally in front of you and plant both feet on the floor shoulder-width apart. This is your starting position.
- Firmly plant your entire left foot on the bench, ensuring that your knee is in line with your toes. Push through the heel of your left foot to extend your leg. Avoid pushing through your toes to prevent placing additional pressure on your shin and knee. As you extend your left leg, release your right leg and step up onto the bench.
- Inhale. Reverse this pattern back to the floor to return to the starting position, starting with your left leg.
- Exhale. Firmly plant your entire right foot on the bench, ensuring that your knee is in line with your toes. Push through the heel of your right foot to extend your leg. Avoid pushing through your toes to prevent placing additional pressure on your shin and knee. As you extend your right leg, release your left leg and step up onto the bench.
- Inhale. Reverse this pattern back to the floor to return to the starting position, starting with your right leg.
Continue alternating between left and right.
Get the most out of your workout with good form
Having the knowledge to perform common bodyweight exercises correctly is important, but I recommend practising these exercises in front of a mirror to ensure you're maintaining good form. This may be especially helpful if you are doing my bodyweight training program High Intensity Zero Equipment wit Kayla.
When you are on point with your technique, you can maximise your training and get the most benefit from each exercise you do.
Remember to give it your absolute all! You are only cheating yourself if you don’t put in the work, so focus on your form and use rest days to give your body time to recover — your results will follow!
* Disclaimer: This blog post is not intended to replace the advice of a medical professional. The above information should not be used to diagnose, treat, or prevent any disease or medical condition. Please consult your doctor before making any changes to your diet, sleep methods, daily activity, or fitness routine. Sweat assumes no responsibility for any personal injury or damage sustained by any recommendations, opinions, or advice given in this article.
<#= c.user.username #><#= moment(c.created_at * 1000).fromNow() #>
<#= c.html_body #> <# if (c.images) { #>
<# } #>